January has come to a close and now, one month into the new year, seems like a good time to do my first review of 2017.
At the end of 2016, I made the resolution to go to the gym at least three times every week (not a new year’s resolution; the timing just happened to coincide). Three times a week is not very much but, just over one month in, I’m already finding it difficult to muster the determination to make the four-minute trek to the gym.
Normally, when choosing goals, I make a point of only accepting goals that are SMART. Anyone who has had to sit through soft skills or personal development training is likely familiar with SMART, which an acrostic for:
- Specific
- Measurable
- Agreed upon
- Realistic
- Time-based
Check. Check. And checkity-check-check. But it turns out that having realistic and measurable goals alone may not be enough. Without a way to visualize progress it’s stupid easy to start sliding back down the slippery slope to sedentariness, especially since the task is not fun. So what is fun?
Visualization is Fun
People realized this a long time ago, which is why infographics and Norse are things. Of course, the people at GitHub also realized the power of visualization and public shaming at some point, which is why each user’s profile has a contributions calendar.
Here’s what my contributions calendar looks like for the past year.
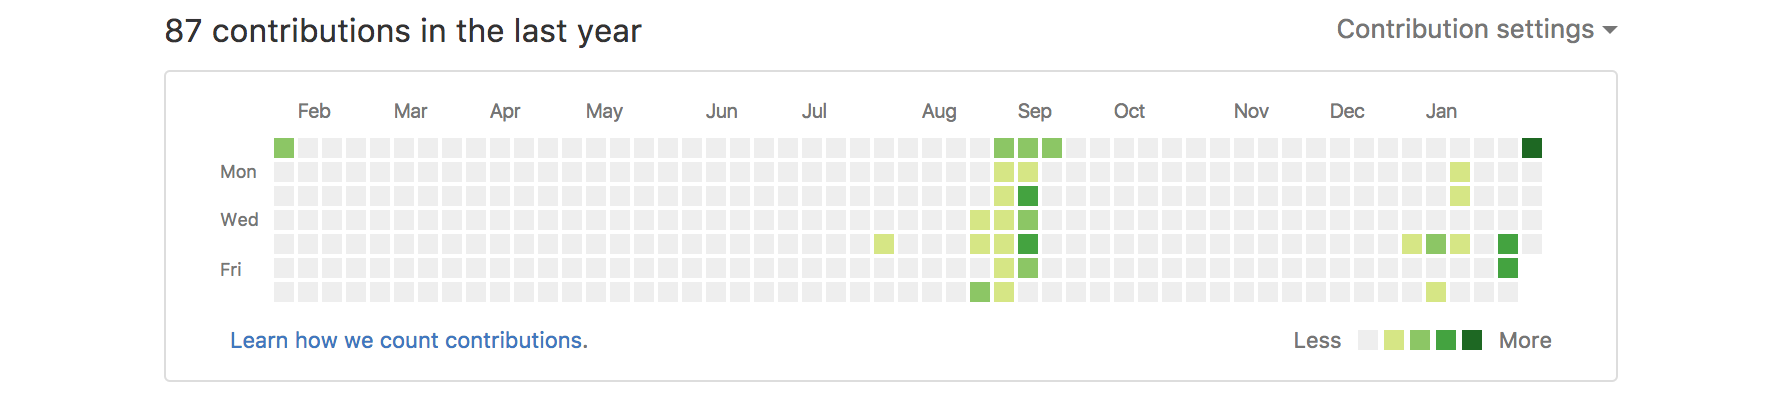
Shamefully sparse 😔, I know, but what if I could use all that blank space to record and visualize my gym attendance? It’s perfect! It’s free and I would get that pretty green-speckled calendar I’ve always wanted. Let’s do it!
Requirements
I don’t want to spend a lot of time on this project, so I will keep the scope as small as possible. My main requirements for this tool are:
- Simplicity - If it’s not simple I probably won’t use it. I don’t want to have to think about anything at all. That means no heart rates, calories burned, blood pressure, distance run, or whatever else. Did I go, or didn’t I—that’s all I care about.
- Ease of access - It should be as easy as launching an app on my phone. No navigating to web URLs or logging in.
- Cost - It should be cheap or free. I’m already paying for a (relatively pricey) gym membership. I don’t want to pay for app hosting or data storage as well, especially for a tool I’ll use at most once per day.
All of these should be fairly easy to achieve. In particular, the use of GitHub means that there is no need to setup or manage a separate storage tier.
The Web App
I wanted the app to be as simple as possible, so I chose to go with a very minimal web app, written using ASP.NET Core MVC. There will be no fancy JavaScript apps today. Just a good old HTML form and a single button that, when pushed, appends the current date to the README file of a GitHub repository.
What I came up with looked like this:
It’s not super pretty, but it’ll do. However, there are still some things that I don’t like.
- It looks (kind of) like a web page, and not really like a mobile app.
- There’s a lot of distracting/ugly browser chrome.
- The URL is still required when opening the app (and it’s visible in the ugly chrome).
Luckily, iOS (and Android, although I didn’t test on an Android device) provides workarounds for these problems using special meta tags, which allow web pages to provide native-app-like, fullscreen experiences.
<meta name="apple-mobile-web-app-capable" content="yes">
<meta name="apple-mobile-web-app-status-bar-style" content="black-translucent">
<link rel="apple-touch-icon" href="/favicon.png">
The apple-mobile-web-app-capable meta tag, when set to “yes”, instructs Safari to render the web page in fullscreen mode.
The apple-mobile-web-app-status-bar-style tag is used to set the status bar style. Here I am using black-translucent, which sets the status bar to be translucent and overlays the status bar content on top of the web content.
Finally, the apple-touch-icon tag tells iOS where to find the icon to use for the web link on the iPhone home screen. If this is not specified, a screenshot of the web page will be used instead. In this case, I just use the same icon used for the favicon.
The final result is a web app that looks and behaves relatively like a native application.
Storage
As stated before, a GitHub repository is going to be used for storage. When the lightning-y button is tapped, the web app should
- Append the current date to the repository README file,
- Create a new commit with my GitHub account as the committer/author,
- Push the new commit to the remote master branch.
The GitHub API makes this all very easy, but first it’s helpful to have a basic understanding of how git works.
Let’s Git it Up
Git is essentially a filesystem implemented as a key-value store. When a new git repository is initialized, git will create a directory called .git. Inside .git is where git objects and related information are stored. When a new object is added to the repository, the SHA1 hash of that object is returned as a key which can be used to reference that object.
The git objects that we will concern ourselves with are blobs, trees, and commits. Blobs represent content (files, symbolic links, etc.). Trees are roughly analogous to directories and store information about blobs or subtrees, such as the name and object hash. A commit object references the top-level tree and keeps information like the timestamp, author/committer, and commit message.
For GymTracker, I already initialized the repository with a README file, so the initial object tree should look something like this:

To update the the README file, we need to create a new tree with a reference to a new blob, which is a snapshot of the updated file. The GitHub API takes care of most of the gritty details1 of doing this with the /git/trees API. Here’s the code to do this.
public async Task<string> CreateNewReadmeTree(string baseTreeHash, string readmeContent)
{
    var content = JsonConvert.SerializeObject(new GitChangeTree
    {
        BaseTree = baseTreeHash,
        Tree = new[]
        {
            new GitChangeTreeContent { Path = "README.md", Content = readmeContent }
        }
    });

    var request = new HttpRequestMessage(HttpMethod.Post, GetGitTreeUrl(_userName, _repository))
    {
        Content = new StringContent(content)
    };

    var response = await _client.SendAsync(request.Authorize(_accessToken));
    if (!response.IsSuccessStatusCode)
    {
        throw new GitSourceException($"Create readme tree operation returned with status ({response.StatusCode})");
    }

    var respContentString = await response.Content.ReadAsStringAsync();
    var responseContent = JsonConvert.DeserializeObject<GitTree>(respContentString);
    return responseContent.Sha;
}
In addition to the new README content, the method accepts a parameter called baseTreeHash. This is the hash of the previous top-level tree, and is retrieved from the most recent commit (that part is boring, so I won’t include it here). The output of the method is the hash of the new tree object, which is needed to create a new commit. Calling the method creates a new tree, with the same structure as before that points at a new blob containing the updated README content.
Next, we need to create a commit object. The code to do this is exactly the same as the code to create the tree, except instead of a tree object, we send a commit object.
var commit = new GitCreateCommit
{
    Parents = new[] { parentHash },
    Tree = tree,
    Message = message
}
The commit object contains a list of previous commit hashes (in this case, there’s only one), the hash of the new tree, and a message describing the commit. Once the commit has been created, the updated structure will look like this:

In order for the new commit to show up in the contributions calendar, one more step is necessary: we have to update the main branch reference to point at the commit. Contributions to this repository are tracked on master branch, so the reference that needs to be updated is refs/heads/master. The GitHub API does this with the PATCH /git/refs/:ref API, which takes the key of the new commit.
public async Task PatchRefToCommit(string commitHash, string refPath = "refs/heads/master")
{
    var commitContent = JsonConvert.SerializeObject(new GitCommit { Sha = commitHash });
    var method = new HttpMethod("PATCH");
    var request = new HttpRequestMessage(method, GetPatchReferenceUrl(_userName, _repository, refPath))
    {
        Content = new StringContent(commitContent)
    };

    var response = await _client.SendAsync(request.Authorize(_accessToken));
    if (!response.IsSuccessStatusCode)
    {
        throw new GitSourceException($"Create commit operation returned with status ({response.StatusCode})");
    }
}
And that’s it! Now, when I press the button on the web app, a new contribution to show up in my contributions calendar. Let’s try it out!
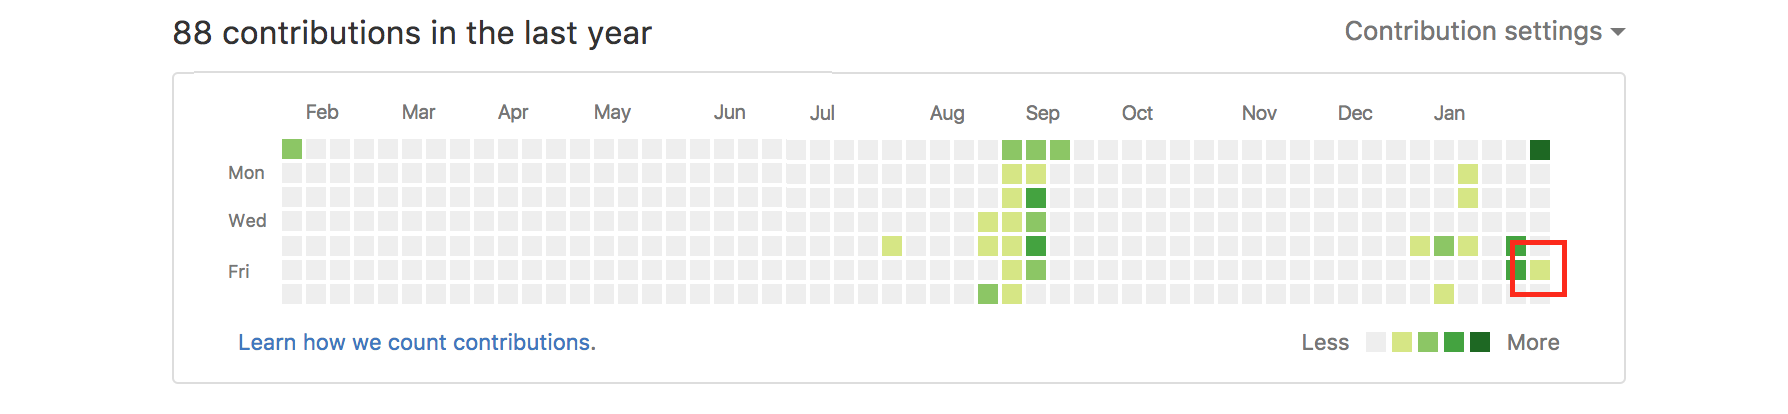
Success!🍻
Hosting and Deployment
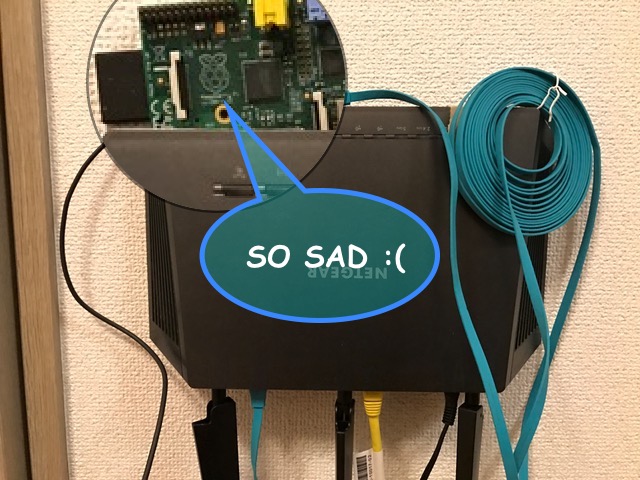
My original plan was to host the app on a Raspberry Pi Model B that’s been gathering dust for the last few years. But after installing Arch Linux and docker, I found that .NET Core still doesn’t play nice with ARM. After several failed attempts to cross-compile the application, I gave up and decided to search for another option.
For the last year and a half, I’ve been using Azure quite a bit for both personal and work projects. Azure provides ten free app services (fancy term for PaaS web apps with lots of add-on features) per subscription. Free app services run on shared infrastructure, and they can take 10s of seconds to warm up after being inactive for a while, but you can’t argue with free!
Azure app services also provide some nice convenience features, such as continuous delivery from a git repository. Setting the app service to track and automatically deploy from the app branch means no more manual deploys.
In the End
So, now that GymTracker is complete, is my problem solved? Mm…probably not. Although I can now visualize my gym attendance, there’s no one checking GitHub to make sure that I’m actually keeping up with my goal. At the time of this writing, I have only two followers and they’re certainly not concerned with whether or not I’m getting enough exercise.
Another issue is that in making a tool that is super easy to use, I’ve also made it super easy to lie. I can easily imagine a situation in the near future where I’m lying in my futon—a small cocoon of warmth in the surrounding world of bitter cold—and thinking, I’ll just push the button now and make up for it in the morning. Ha! Like that will ever happen.
Finally, in the event that I do become more active on GitHub, real contributions will interfere with my gym visualization.
But in the end all of that doesn’t really matter. I made a thing, and it was fun. Isn’t that what’s important?
The complete source for this project is available on GitHub.
-
For more detail on Git internals, check the Git Internals section of Pro Git, by Scott Chacon and Ben Straub. ↩︎
More articles from Dan Merritt

No, I Don't Want You to Join My LinkedIn Network
Okay maybe that's a bit harsh, but one of my pet peeves is when random people on LinkedIn send connection requests without even bothering to change
Gym Tracker Visualization Using Github
January has come to a close and now, one month into the new year, seems like a good time to do my first review of 2017.